


We may receive a commission when you use our affiliate links. However, this does not impact our recommendations.

This winged box is turned fast, and the end result will leave people asking how you did that.
Project #2504 • Skill Level: Advanced • Time: 4 Hours • Cost: $20
Before beginning this project, I want to warn you that this woodturning project is not for the faint hearted. I would recommend that you not only have the confidence but also tool technique and ability to attempt it. The speed you are ability to turn makes a huge difference given the fact that the base of the box is 10“ long, 4“ wide, and a 2-1/2“ thick piece of maple. Also, given the fact that it is a rectangle rather than round or square, there will be a lot of cutting and missing effect as it is turning. That’s where the speed comes in, the faster the piece is turning, the more “solid” it becomes as the time between cuts are lessened.

Cutlist and Diagrams
 Prepare
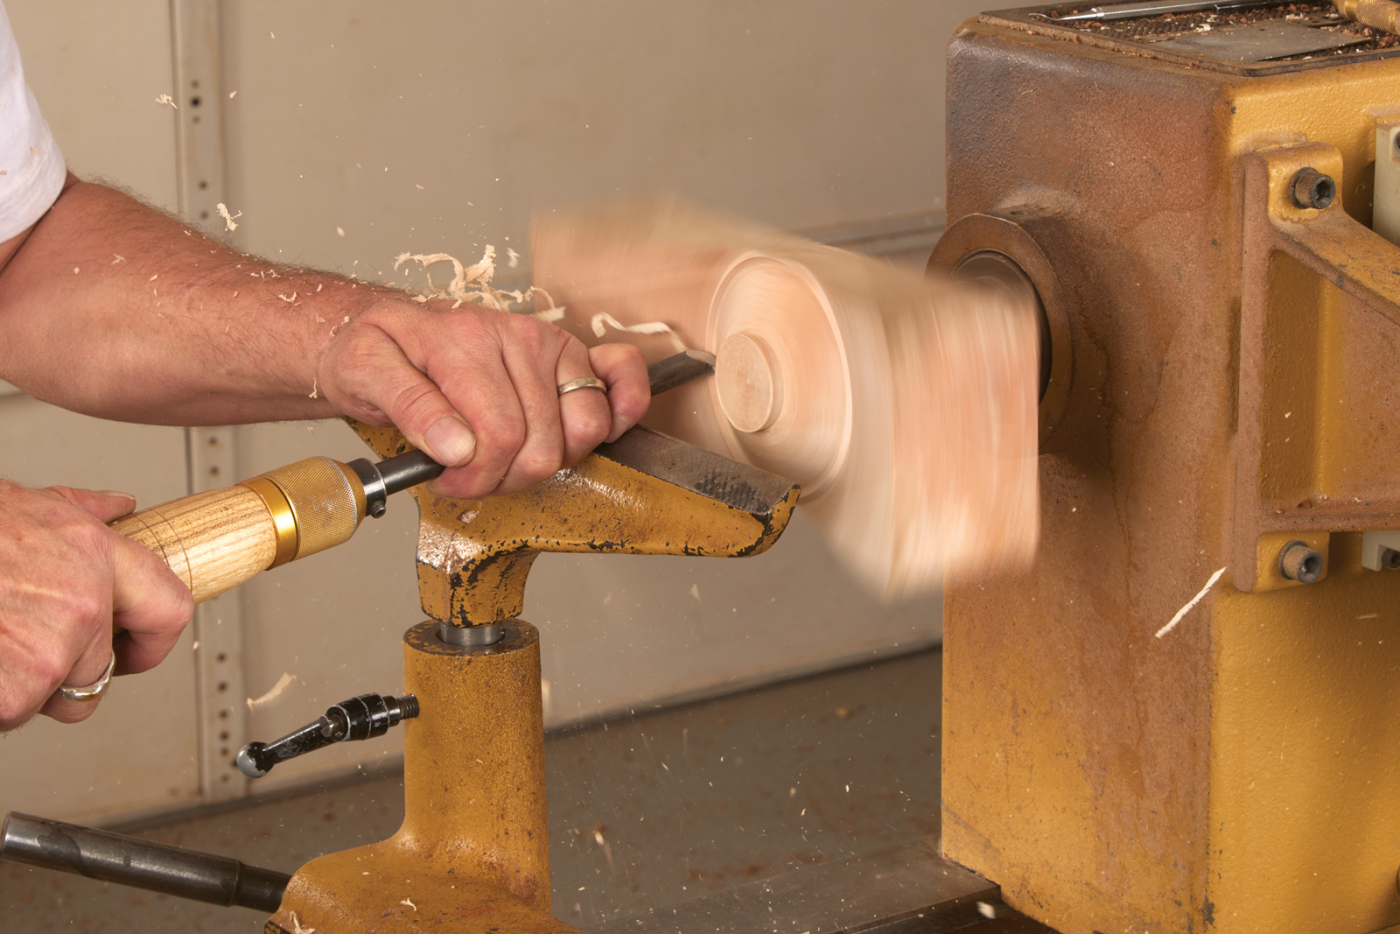
For accuracy, make sure thatthe blank is accurately cut and square before marking the center of the face and using a center pop to allow for accurate drilling for the screw chuck. I prefer to use the screw chuck because as you are turning, the resistance is actually tightening the piece onto the chuck. I’m using a Vicmarc VM 100 chuck. A little wax on the screw and in the hole will help to take the piece on and off the screw chuck. After mounting the base onto the screw chuck and making sure that the piece is tight against the face of the screw chuck, you can begin turning.

1 Start with a center hole for the screw chuck.
Few Notes Before Turning
Before we begin, I want to point out the noise that you will hear as you turn. As you turn the speed up, the sound the wings make as they catch the air will also increase. Don’t worry, it’s only a noise! Had the piece been a round bowl blank, there would be very little noise at the same speed.
Okay, so here we are. I turn these pieces on my Powermatic 3520B at 3,200 rpm, which is the fastest speed it will go. The slowest speed I turned one at was 2,000 rpm and it, in my mind, was far more difficult from a tooling point of view but still achievable. One other thing… when turning the lathe on and off, remember the piece has wings that are difficult to see. It was this piece that got me a reputation in the woodturning world as a somewhat “dangerous” wood turner! A little unfair in my mind as most of the audience in a demo didn’t understand the physics needed to execute the turning and most of them had never needed to turn at that speed unless it was a pen.

2 The first cut is to form the curve of the bottom. Start at the outside edge and make a soft curve towards the center.
Let’s Turn the Bottom
The first cut, using the wing of a 1/2“ bowl gouge with an Irish grind, is a push cut from the edge of the piece towards the middle to a depth of about 1/2“ at the center. It’s basically a soft curve. If the surface is not relatively smooth, you will be off the bevel and cutting with the tip of the tool. The bevel not only controls the tool but tells you in which direction you’re cutting. The reason for this is that I want the piece to sit on the wings rather than on a foot and so the tenon need to be higher than the wings in order to remove it later.

3 As you work in, the piece gets shallower and shallower. Here’s where the tenon will be formed for reversing it on the chuck.
After cutting the first curve, I then mark out for the tenon. Using a 1/8“ parting tool, I cut to the left of the scribed line to a depth of about 1/4“. I am happier as it provides a safer hold in the chuck.

4 Carefully use your dividers to mark out the tenon.

5 A parting tool can be used to start to define the tenon.
We then need to start the outside of the box section by cutting away from the tenon. You will need to be aware so the wings of the bowl gouge don’t catch. To avoid this happening, you will also need to cut from the outside of the wings of the blank towards the middle to match the cuts when turning the box section. Be sure to take careful cuts and as many as necessary in order to build up the final outside curve. Again, watch the wings! At this point, the diameter of the box is about 3-3/4“ and so it is within the 4“ width of the piece. This allows for an aesthetically clearly defined edge of the box.

6 Switch back to the bowl gouge and start to form the bowl shape of the bottom.

7 Remark the tenon if you removed it during waste removal.

8 Final shaping of the bowl and tenon can be done.
9 Make sure to dovetail the tenon.
Next, I carefully power sand the box section in the middle and the first 1“ away from it. Then I hand sand the rest of the wings as this is much safer and avoids bruised or cut fingers. I started with 180 grit and finished at 400 grit.

10 Sand the underside of the box, keeping your hands clear of the wings of the box.
After sanding, my preferred finish is to seal the wood with a thin coat of Zinsser’s wax free shellac. After letting it dry completely, I additionally give mine a thin coat of natural Danish oil being sure to wipe off the excess. The finish does “pop” the grain in the wood.
Turning Inside Face
After unscrewing the base from the screw chuck and mounting it in the chuck, you can now start the inside face of the box starting with the wings.

11 Flipping the box around, mark out the shape of the wing.
I firstly mark the outside edge of what will become the box part in the middle of the piece. The wings have to be stepped down gradually using small careful cuts. Using the wing of the 1/2“ bowl gouge and drawing the gouge towards me, I make cuts with the grain cutting downhill. You will notice that the sound of the piece turning has decreased a lot and is not quite as intimidating now.

12 With a bowl gouge, start to sweep out the wings.

13 You’ll be mirroring the shape of the bottom.
Again, take your time and take as many controlled cuts as necessary. You can take wood off, but you can’t put it back on! I turn the first 1/2“ of the wings to the finished thickness of 1/8“ and then carefully continue the same cuts for the next 1/2“ and so on and so on. Note in photo 16 that I have drawn a line which I can see and follow when the piece is turning. The wings taper from 1/8” thick at the tips to approximately 3/8“ thick at the box part. I feel the taper is delicate and “lifts” the piece aesthetically.


15 Drop the handle a bit and use the wing of the gouge to blend in the curve.

16 Define the bowl edge with a parting tool.
After the wings have been completed, you can now start to hollow the box section. I use my 1/8“ parting tool and cut squarely to a depth of 1/8“. The reason for this is that when the piece is completed, it can be rechucked and the tenon removed to finish the underside of the box with a nice uninterrupted curve. The flat allows the chuck to sit squarely when rechecking. Make sure that the plunge cut with the parting tool is square as this is also going to be used as a jointing surface for the lid.

17. Hollow it out with a small bowl gouge.
I hollowed out the box using a 1/4“ gouge as the 1/2“ bowl gouge will be too large and the heel would likely rub behind the cut and bruise the wood. A scraper would also work—in face use whatever tool you feel comfortable using to accomplish this task. The box hollow is basically a hemisphere
The piece was then sanded starting with 180 grit and finished with 400 grit and finished just the same as the underneath of the box.
Onto the Lid
Now to turn our attention to the lid, no pun intended! The lid is 3-1/2“ wide, 5“ long, and 2-1/2“ thick. Accurately cross the face and find the center. This piece is chucked straight up against the fence of the jaws using the tailstock revolving center as if it were a piece of spindle work. It is perfectly safe and secure.

18 The top is marked before installing.

19 Pinch the top between the tailstock and the chuck.
I turned the speed down to 2,500 rpm as the time between cutting and missing is less. This time I produce the tenon by cutting some of the wings away again using the Irish grind bowl gauge and drawing the tool towards me therefore cutting the grain. I cut about halfway down the blank. This makes access easier to cut the tenon with the parting tool. After cutting the tenon, take the piece and mount it in the chuck as we will be working on the underneath of the lid first. Then a similar cut to the base is made, cutting from the outside wings towards the middle, producing a soft curved. Remember if you don’t get a smooth surface then you are riding the bevel and will be cutting with just the tip of the tool. The lid looks far better if the curve on the lid matches the curve on the base.

20 Start to form the bottom curve of the lid. This matches the curve on the top of the box.
Then measure a little larger than the outside diameter of the box recess and scribe a line on the underside of the lid. With your parting tool, make a plunge cut about 1/8“ deep and square to the surface. This will become the joint for which to attach the lid to the base. Keep making tiny cuts to reduce the diameter of the joint and the excess wood on the wings until you can fit the base to the underside of the lid. Note that the slight flare on the wings of the lid match the flare of the wings on the base. The joint is then hollowed out slightly to reduce the final thickness of the finished lid.

21 Measure the opening in the top of the box with dividers.

22 Transfer that measurement to the inside of the box.

23 Define the tenon with a parting tool and remove the waste with a gouge.

24 Check the fit—you want a complimentary curve.

25 Make adjustments as
necessary.

26 The fit you’re looking for between the top and the base.
With the underside of the lid now turned, we can now sand and finish as we did on the base down to 400 grit, sealed, and lightly oiled.
Remove the lid from the chuck and carefully turn it around and hold the joint into the jaws of the chuck. Another way is to jam chuck the lid into a scrap piece of wood. Bring the tailstock up for extra support. Then just as I did with the base, step the cuts down gradually until you turn the outside 1/2“ of the lid’s wings to the thickness of just less than the lid.

27 Start to form the curve of the top. Step down the waste to near-finished shape.

29 Then blend it together.
This looks aesthetically pleasing. Continue the steps until you have removed most of the waste material whilst leaving approximately 1/2“ of wood in the center which will eventually become a handle. The curve on the lid is a slight ogee but still reflects the shape of the base and gives the impression that they are meant to be matched together. Again, like the base, the lid tapers and is slightly thicker towards the top where the handle is located.
The handle itself is shaped using a 3/8“ spindle gouge and it is basically like cutting a cove. The piece can be supported up until the very last few cuts when the tailstock can be removed for total access to the top of the handle. Taking small cuts, turn a slight dome on the top of the handle. Be careful as the grain will be short on the stem of the handle and it could snap with a catch or heavy cut. If this happens, just turn a finial, drill a “stopped” hole in the lid and glue the separate handle in place.

29 Start working down the handle to a cylinder. Shape the handle with a couple of cove cuts.

30 A slight undercut lifts the handle off of the top. When the shaping is done, remove the tailstock and make a light finishing cut to curve the top of the handle.
The lid can now be sanded and finished like the rest of the piece.
Final Touch
To finish the piece, we need to remove the tenon on the underside of the base. To achieve this, just remove the lid from the chuck, pick up the base, and expand the jaws into the joint. Make sure that the jaws are sitting squarely and flat on the 1/8“ step cut in the joint for the lid. The speed can be turned down to a sedate 1,800 rpm as you are just removing the tenon. Take several small cuts with the 1/4“ bowl gouge and remove the tenon making sure that the curve on the base of the box flows into the original curve.
Now simply sand and finish as before. If you worked with rough sawn stock, sand the edges of the base. Remove the base from the chuck and put on the lid. Place it at eye level then stand back, look, and be very proud of yourself as this is not an easy piece to execute!
Here are some supplies and tools we find essential in our everyday work around the shop. We may receive a commission from sales referred by our links; however, we have carefully selected these products for their usefulness and quality.


