


We may receive a commission when you use our affiliate links. However, this does not impact our recommendations.
 Not too big, not too small. This chest is a handy size for a basic set of tools.
Editor’s note: This article originally appeared in the June 2009 issue of Popular Woodworking Magazine.
It’s the modern joiner’s dilemma. An old house over in the next county has missing mouldings on the mantel, a kicked-in panel on a bedroom door and seven sash with rotted rails. The question is: Do you lug your full tool chest to the site, or do you pick your planes and pack them in a satchel? The big chest needs four men to move it, and the satchel is a jumble. What you need, of course, is something midsized – you need a chest for the road.
This midsized chest is also a midsized challenge. The sides are common through-dovetails, but the skirt requires a few variations that will bring your dovetailing skills up a notch.

Equally important as the dovetails are the interlocking grooves – grooves that join the bottom into the skirt, the skirt into the broad sides and the panel into the frame of the lid. Even the miter-shouldered bridle joints in the corners of the lid are just overgrown tongue-and-groove joints. The keystone to this chest is the interlock that joins the skirt to the sides. The skirt itself adds depth to the chest – without your having to glue up your stock edge-to-edge. With the narrower boards available these days, a deep dovetailed chest is usually made up from two or more boards glued edge to edge to make one broad one. But even when the joints are well executed, the built-up look of the sides is always disturbing.
Here though, after subtracting the 1-1⁄2” overlap, joining the 5-1⁄2” skirt to the 11-1⁄4” sides allows these readily available widths to add up to a 15-1⁄4“-deep chest.
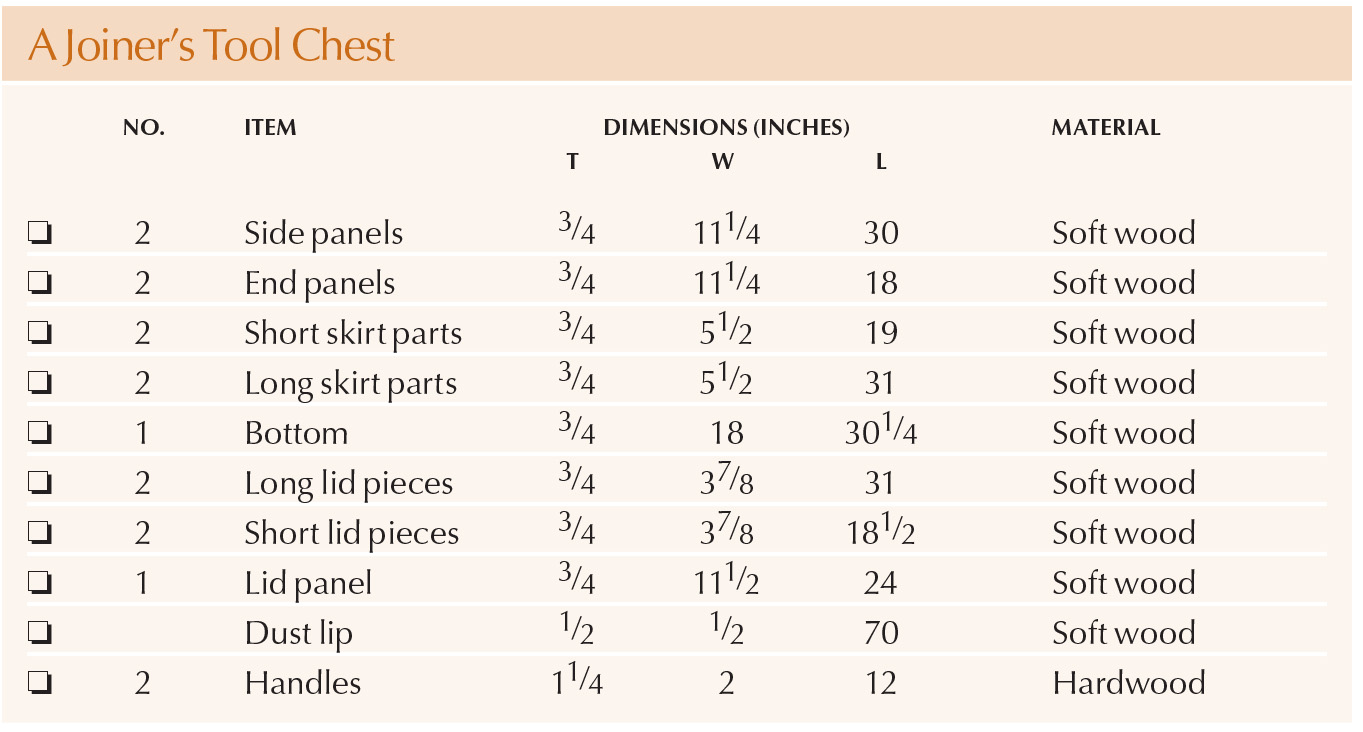
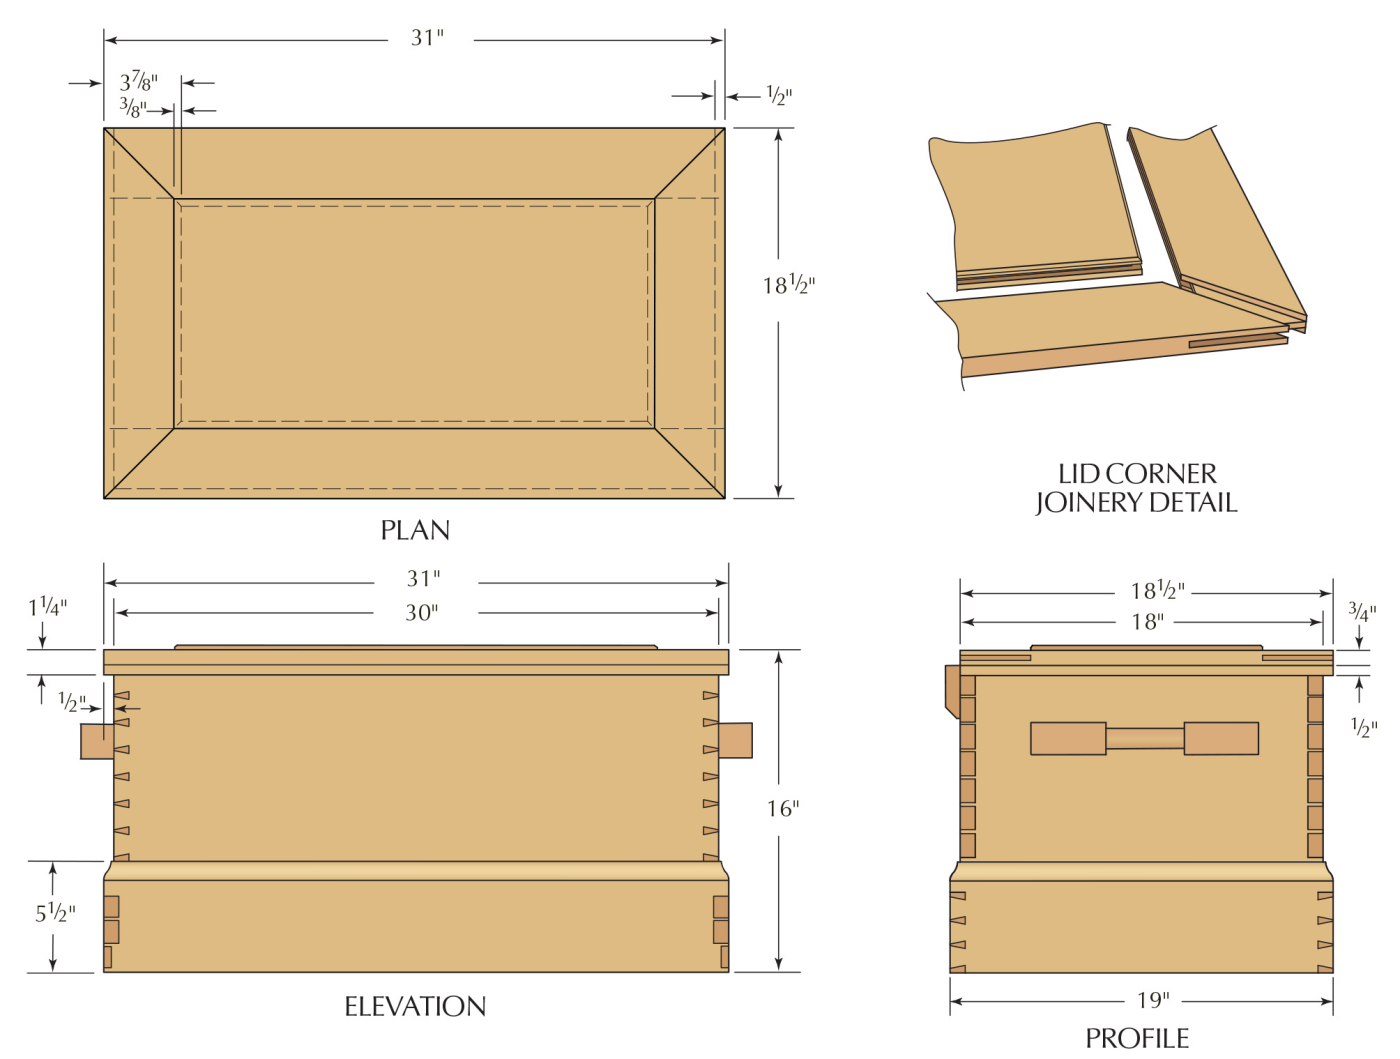
Custlist and Diagrams

The Gauge Rules

Grooves, pins and tails. Pulling away this one piece of the skirt reveals all this chest’s secrets.
With all these long grooves (more than 38′ by my measure), smart money would bet on the plow plane as the most valuable player. My vote would go instead to the double-toothed mortising gauge. The plow plane, making repeated passes and occasionally rocking over, tends to open up. By the time you get to the last board, the fence has eased and the groove is farther in from the edge than you intended. By contrast, the mortising gauge makes only one pass down each board and easily holds its setting. The sharp teeth of the gauge also help the plow plane make a clean job by severing the grain at the surface. For that matter, if you are plowless at the moment, once you’ve scribed the lines with the gauge, you can cut all the grooves with chisels in short (well, medium) order.

Mark and make your groove. The first joinery is making the interlocking grooves in the pieces for the skirt and top section of the chest. Mark their locations with a mortising gauge first to increase your accuracy.
As in drawer building, grooving comes before dovetailing. Set your mortising gauge to 3⁄4” in and 3⁄4” wide and run it down the lower face of the side-board stock and the upper back of the skirt-board stock. Plow the groove 1⁄4” deep within these lines. Unless you have a very long bench, you’ll need to crosscut the boards into shorter sections for the plowing. You can cut the side boards to their final length, but it’s wise to leave each of the four boards of the skirt an inch longer than needed – just in case.
I’ve dimensioned this chest so that the broad (expensive) side boards and top panel can be gotten out of a single 10′ plank of pine or poplar. This gives you a chest 30″ long by 18″ wide, but if you want your 32″-long rip saw to fit inside, adjust accordingly.
Dovetail the Sides

Miter first. Saw the miter in the skirt, but saw a little shy from your scribe line. You can tune up this joint later by laying a saw kerf through it.
Dovetails are strong in one direction and weak in the other, so it makes sense to orient them to resist the greatest load. In a tool chest that gets lifted and pulled along from the ends, the pins might logically go on the end boards. This also orients the attractive sloping face of the dovetails to the front of the chest. These days, the approved slope of dovetails has become beige and unthreatening – one in six (1:6) or so. But look at an old chest and the angle can be bold – up to a frighteningly steep one in three (1:3). For a conservative 1:6 slope, no one will object if you make the pins equal to half the 3⁄4” thickness of the wood at their widest point and the tails a bit less than twice the thickness of the wood. A steep slope will require bigger pins, because the slopes would converge before traversing the thickness of the wood. No matter the slope and spacing of the dovetails on the sides, treat the edge of the chest’s interlock groove (which joins the skirt) as if it were the edge of the board, ending with half-pins as custom demands.
I’ll assume you know how to cut the through-dovetails for the broad boards of the sides. If not, you can readily find this information elsewhere or derive my preferred method when we get to the skirt.

Straight, then sloped. The first cut with the dovetail saw below the miter is straight across the skirt.
You may not need four people to lift this chest, but that’s a good number to have around when you glue the sides. First, though, dry-fit the dovetails, pushing them at least halfway home. Pay close attention to the edges of the boards – the half pins are easily split away by a fat fit. Make any shims you’ll need to fill mis-cuts and place them at the ready at each corner. Before you call in your helpers, set a box of doughnuts at the other end of the shop. Have everyone take a corner of the chest and paint on the glue. Squeeze up the sides with bar clamps, testing for equal diagonals to square the corners. Thank your helpers and send them off to eat the doughnuts – otherwise, they’ll all want to help you tap in the shims. That is a job you need to do by yourself.
The Skirt

Sloped for symmetry. Angle your rule across the skirt to divide the remaining area into three parts.
In a painted tool chest where the dovetails will not show as prominently, you might choose to orient the dovetails in the skirt counter to the ones in the chest sides. This is not pretty, but it’s stronger and better resists the outward thrust of an expanding bottom. In a varnished chest of nice wood living a less rough-and-tumble life, however, I’d orient the dovetails of the skirt and sides in the same direction.

From the center out. Lay out the slopes of your tails from the centerlines you established with your rule.
The skirt-board stock already has one groove plowed into it for the interlock. It now needs a second groove, 3⁄8” wide and 3⁄8” in from the edge, to hold the rabbeted 3⁄4” bottom. Plowing these grooves first helps you lay out the dovetails to cover them.

No knife needed. Use your dovetail saw to scribe the pattern for your pins. Use light pressure. You don’t want to plow a groove.
For the skirt joinery, it may help to think of each corner of the skirt as having two regions. The upper region is a simple butted miter joint that conceals the interlock groove and gives the moulding a neat corner. The lower region is dovetailed, with three tails and four pins. You could start in either area, but I’ll begin with the miter because once you have cut it, the region for the dovetail is more clearly defined.
See that your ends are planed square and true. Set your cutting gauge to the thickness of the wood, plus 1⁄32“, and mark all around the ends of both pieces.

Straight across, but not straight down. The first cut on your pin board defines the mitered area that will meet the tail board. It does not break through on the show side of the skirt.
Use the line scribed by the cutting gauge on the back sides as the origin for the 45° lines across the edges that define the miter joint. As always, you want to saw on the waste side of the line, but here you might choose to leave a bit more meat on each mitered face. That way, when you bring the joint closed, the mitered faces will hit before the dovetails fully seat. You’ll then be able to “kerf in” and close the joint by sawing precisely down the seam. On a miter, you usually want to saw from the “inside out” so that you cut more with the flow of the grain. Once you have planed mouldings into the stock, however, you need to saw into the finished face to keep the edges from feathering. The mitered edges of the moulding are also quite sharp and easily damaged as you cut the dovetails. Leaving the mitered faces just a hair fat then kerfing them in at the finish helps protect them from damage.

Crosscut the shorty. Saw out the shallow dovetail joint at the bottom of the skirt. See the illustrations for details on what this looks like.
Stand the piece chosen for the tails upright in the vise and square across the end grain precisely at the edge of the interlock groove. Carry this line down the face to the gauged line. Follow this line with your saw, working carefully to leave the interlock groove at its full width rather than letting the saw slip into the groove.
Lay out the dovetails using the diagonal rule method, positioning the rule to end at the centerlines of the spaces for the ending half-pins. Here, marks made every 11⁄2” along the rule divide the dovetailed part of the skirt into three equal parts.
Measure out the width of the pin-spaces from the centerlines and draw the slopes down to the edge, guided by your bevel gauge. Note that the spaces of the half-pins are just as wide as those for the two full pins – they are “half” only in the sense of having a slope on but one cheek.

Kerf in. If the miter closes before the dovetails, run your saw through the miter joint. Saw into the joint as shown to avoid feathering where the saw exits the miter.
Stand the piece upright in the vise and carry these lines square across the end grain. Saw just the cheeks of the dovetails.
Remove this tail piece from the vise and stand the pin piece in its place, positioning its end flush with a plane laid on its side. Slide the plane back and set the tail piece spanning the two, carefully aligning the mark of the cutting gauge on the tail piece with the inside edge of the pin piece. Hold everything steady as you draw the dovetail saw back through each kerf, transferring the cut lines to the end grain of the pin piece.
Square the transferred lines down the face of the pin board to the gauged line. The socket that houses the groove for the bottom is only half as deep as the other two and must be marked accordingly. Mark the end grain of the dovetail first, indicating the wood to pare away. Then, reset the cutting gauge to mark the depth of the socket by adding 1⁄32” to the previous setting. This is all easier done than said.
Begin the pins by aligning your saw precisely with the waste side of the transfer marks and sawing down. Remember to saw only the inside diagonal of the cheek of the pin that coincides with the wall of the interlock groove. If you used too much pressure when transferring, the marks will be more like shallow grooves that try to pull your saw into them. Cut beside them, not in them.
Saw the mitered end, then saw out the bulk of the wood between the pins with your coping saw. Pare back to the gauge lines. On the final slice, set the chisel right in the cut made by the gauge.
Return to the dovetailed board and chisel out the spaces for the pins.
Saw and chisel the shallow dovetail flush to the line coinciding with the bottom of the groove.

Moulding after mitering. Here I’m using a complex moulding plane on the skirt. Before moulding the skirt, remove the bulk of the waste with other tools.
When you push the skirt joint together, the miter should close just as, or just before, the dovetails hit bottom. If you need to kerf in the miter, first see that the corner is square and firmly held. Saw right down the seam from the outside face with a fine saw and be sure to stop before you cut into the half pin of the dovetail. Pull the joint open, inspect the mating surfaces and remove any remaining wood with a chisel. Close the joint again and check the fit. Four surfaces in three different planes have to meet at the same time, so you see why I suggested leaving the skirt pieces an inch or more longer than needed – you’ll have at least one chance to start over.
The decorative moulding around the top edge of the skirt might be a simple bevel or an ogee or something more complex, but such decorative touches are often well left for last so they won’t get banged up. Just as with the grooves, it’s best to lay out the moulding with a gauge before planing. Here though, any sharp scribing points would leave their traces, so a pencil gauge or pencil divider is the ticket. Following these pencil lines, rough in the moulding with a drawknife and gouge, and use the moulding plane to bring it home.
The skirt has to fit around the waist of the chest, bottoming into the interlock. Too loose and the glue surfaces won’t meet. Too tight and the skirt joints won’t close. Don’t glue any corners until you have fitted it all around (and inserted the bottom!). If the skirt is a bit tight, you can plane shavings from the faces of the interlock all around to make it sit a little deeper. If one broad side of the chest has the best looking wood and joinery, see if you can turn the skirt so that it too puts its “best face to London.”
Bottoming

Make a stout bottom. A tongue-and-groove joint in your bottom boards ensures the longevity of your chest.
A good bottom should fit neatly inside the skirt, tight enough to stay in place but loose enough to allow movement. At some point your chest is going to sit on damp concrete or wet grass and its bottom is going to expand. This is when joining cheaper boards with tongues and grooves makes your bottom better. These joints can absorb some of the movement and prevent an expanding bottom from pushing the skirt dovetails apart.
First, join the bottom boards with tongues and grooves into an assembly that is larger than it needs to be. Gauge lines 1⁄4” in on one long-grain side and 3⁄8” in on one end-grain side. Set the chest with its dry-fitted skirt on the bottom and align the inner edges with these gauged lines. Trace the remaining two lines on the bottom and mark it and the skirt so they can be reassembled in the same orientation. Lift off the chest and add 1⁄4” to the new lines on the bottom. Saw and plane the bottom to these lines. Flip the bottom over and use a rabbet plane or moving fillister plane to leave a 3⁄8“-square tongue all around. In the end, the bottom will fit only 1⁄4” into the side grooves, leaving 1⁄8” for expansion. Because the bottom boards won’t expand along their length, the end-grain tongues on the bottom can fit more deeply in their grooves.
Insert the bottom and check the dry-fit of the skirt all around. Glue the interlock grooves and the skirt dovetails. You might use a dab of glue at the center of the end grain of each bottom board, but otherwise leave the bottom dry. Before the glue sets, burnish the mitered mouldings shut with the smooth back of a gouge. After the glue sets, plane off that last protruding 1⁄32“.
The Lid

Remove the cheeks. With the groove already cut by the plow, the tenons’ cheeks are easy to define with a saw.
The grooves and joints that connect the frame and panel of the lid all begin as lines made by the mortising gauge. The gauge lines define the grooving and the grooving defines the joints. It’s easy to see how the sockets of the miter-shouldered bridle joints are just extensions of the groove, but the grooves define the tenons as well. Plowing the grooves removes some of the potential width of the tenons, something you may discover too late if you work out of sequence. Start with the gauge, plow the grooves and work on from there.
Tenon the Long

Trace the tenon. Use the newly cut tenon to define the depth of the mortise in the short rails of the lid.
The tenons of the lid frame go on the long front boards so that the end grain shows only on the side edges of the lid. Mark the face sides of all your pieces and run the mortising gauge around the inner edges and the ends. Plow the groove within these lines. Saw the shoulders of the tenon in a miter box if you have one. Split and pare away the waste wood on either side of the groove and run the gauge down the newly exposed wood to more clearly mark the thickness of the tenon. Now you can stand the end upright in the vise and saw the tenon cheeks without the saw pulling into the groove. This finished tenon now defines the width of the mortise.
Mortise the Short

Saw the shoulders. A miter box makes accurate work of the tenons’ mitered shoulders.
Lay the tenon over the mitered end of the short piece and trace the breadth of its overlap. The mortise of the bridle joint is easy enough to cut out with a rip saw, chisel and rasp, but the plow plane can start the job. Plow a groove down the sloping end grain on the miters and down the short outer face of the mortise and you’ll create a nice shoulder for the saw to ride against. Here’s where the gauged lines rule once more. Because you can only plane down a slope, not up, you’ll occasionally have to turn the wood around and fence from its back side. Unless the groove is dead center, you’ll have to make a slight adjustment to the fence on the plane. Because working within the gauged lines keeps everything aligned in the same plane, you can safely adjust the plane as needed.
Place the Panel

Start with the plow. By beginning to make the mortise with a plow, you create a guide for your saw.
Dry-fit the frame together, then measure the opening to find the size of the panel. As with the bottom, the panel can fit fully in the groove at its ends, but the sides need room to expand. If the 1⁄4“-wide groove in both the frame and the panel is 3⁄8” deep, measure the panel to overlap the opening in the frame by only 1⁄4” on the sides. This will leave room for the panel to shrink and swell over a range of 1⁄2” without becoming loose or tight.

Another revealing corner. Here you can see how the pieces to the lid come together with the panel. Be sure to allow for some expansion when figuring the width of the panel.
Joinery for the chest ends with gluing the lid-frame corners with the dry-fitted panel in place – the rest of the work is connected with fasteners. Hinge the lid with two or three butts and screw a 3⁄4” x 3″ x 30″ stop to the back of the chest to keep the lid from falling all the way back. Glue and screw a 1⁄2“-square lip around the front and sides of the lid, mitering the meeting ends and leaving just enough room for the lid to open and close snugly. You’ve done such a careful job so far, do take the time to track down proper straight-slotted steel screws.
Handles

One-piece handle. The tool chest’s handles are each turned and then sawn from one piece of stout hardwood.
The turned and sawn handles are smaller versions of ones found on an 1830s-vintage American tool chest. Each begins as a 12″ length of 1-1⁄4” x 2″ white oak, ash or maple. Set it in the lathe with the centers at 5⁄8” in from the edge. Turning such unbalanced wood is dangerous so keep it slow. You might want to saw some of the stock away to reduce the wobble and time on the lathe. When the grip is finished, cut out the curves with a turning saw and chamfer the edges with a spokeshave.
The handles take a heavy load, so it won’t do to simply screw them onto the thin end boards. Use multiple screws from inside and out. If your tool chest will have tills sliding on hard wooden rails fastened to the inside ends, plan ahead and move the handles up or down to take advantage of this solid anchorage.
So that’s it. Locks and interior fittings are where you can really strut your stuff – or not. My chest just has two rough sliding tills and a till for moulding planes. Fastened to the underside of my lid you’ll find a saw and some naughty postcards in a space that will forever go begging for fine marquetry. It’s well-traveled, battered and blue. Over time, I expect that your chest will come to reflect you, too.
Stay sharp.
Here are some supplies and tools we find essential in our everyday work around the shop. We may receive a commission from sales referred by our links; however, we have carefully selected these products for their usefulness and quality.


